

TL;DR:
- Capturing Venice at dusk involves arriving early to secure ideal spots during the golden and blue hours. Proper gear, precise timing, and layered compositions enhance the city’s luminous reflections and atmospheric features. Patience and adaptability are key to transforming fleeting moments into stunning photographs.
Dusk photography in Venice is defined as the practice of capturing the city’s canals, bridges, and palazzos during the brief but luminous twilight window when warm artificial light and cool cobalt sky converge into something close to painterly perfection. This step by step dusk photography Venice guide gives you the timing, camera settings, gear choices, and location strategies to walk away with images that feel genuinely alive. You will learn to work the golden hour before sunset and the blue hour that follows, using tools like a sturdy tripod, a remote shutter release, and ND filters to translate Venice’s shimmering atmosphere onto your sensor. The city rewards patience and preparation in equal measure.
What is the best time for dusk photography in Venice?
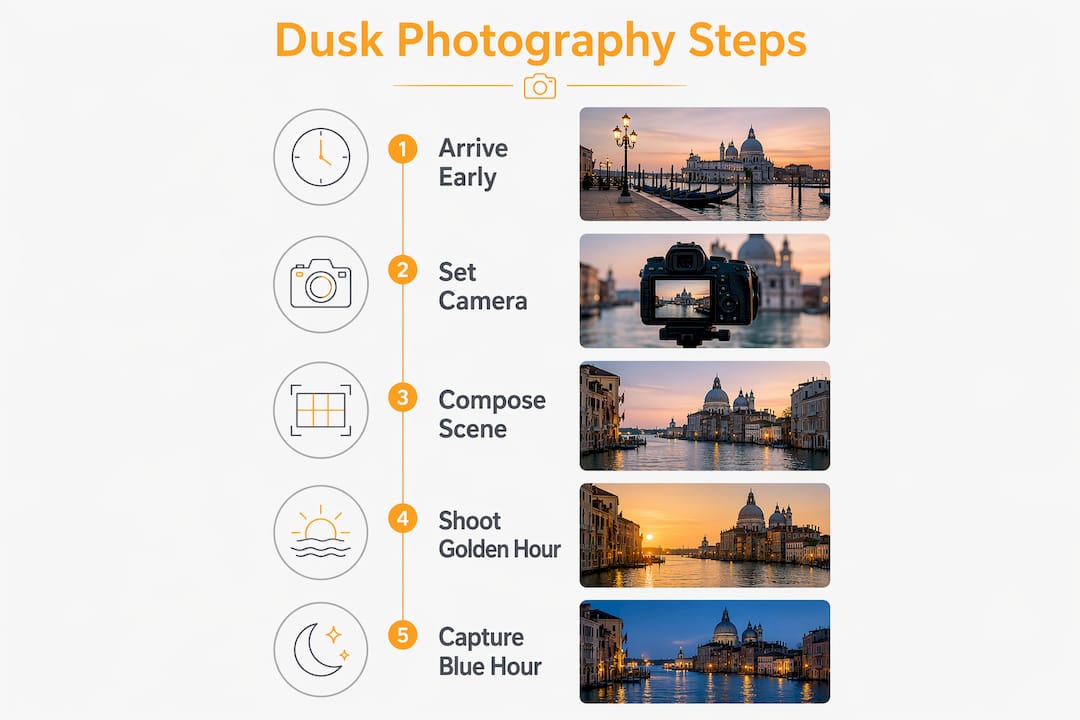
The single most important decision in photographing Venice at dusk is not which lens you bring. It is when you arrive. Venice offers two distinct magic windows each evening: the golden hour before sunset, when warm amber light rakes across terracotta facades, and the blue hour that follows, a 20 to 25 minute period when artificial lights glow against a deep cobalt sky. That second window is where the most atmospheric images live.
Seasonal timing shapes everything. Sunset in Venice falls around 20:55 in late June, 20:15 in late August, and near 17:00 in late October. Summer gives you a late, leisurely shoot; autumn compresses your schedule and demands earlier planning. Knowing your date’s sunset time before you leave your accommodation is not optional. It is the foundation of every other decision you make.
Arriving 30 to 45 minutes before sunset accomplishes three things at once: you catch the golden hour light, you secure your tripod position before other photographers arrive, and you give yourself time to compose and test exposures before the blue hour sprint begins. Venice’s iconic viewpoints fill quickly, and losing your spot to a tour group during the most precious 20 minutes of the evening is a frustration that ruins more shoots than any technical error.
One underappreciated advantage of Venice’s geography: the city’s narrow canals create extended reflection windows after sunset, producing longer-lasting blue hour effects compared to open waterways. The canyon-like walls of the smaller calli trap and amplify the fading sky, giving you a few extra minutes of that cobalt glow that photographers elsewhere simply do not get.
Pro Tip: Download a sunset app like PhotoPills or The Photographer’s Ephemeris before your trip. Both show exact sunset and blue hour windows by GPS location, so you can plan your walk from your hotel to your chosen spot with a precise departure time.
What camera settings and gear do you need for Venice dusk?
The technical challenge at Venice dusk involves three interlocking decisions: choosing the right timing window, deciding between sharp architecture and silky water effects, and managing the sky-to-light exposure ratio without losing detail in either the highlights or the shadows. Getting your gear and settings right before you arrive means you spend your blue hour shooting, not fumbling with menus.
Here is the baseline gear list for dusk photography in Venice:
- Tripod. A stable tripod is non-negotiable for exposures longer than 1/80 of a second. Carbon fiber models from Manfrotto or Gitzo are popular choices because they are light enough to carry across Venice’s bridges without fatigue.
- Remote shutter release or camera timer. Even touching the shutter button at 10 seconds of exposure introduces blur. A wired or wireless remote, or the camera’s built-in 2-second timer, eliminates this entirely.
- Wide-angle or standard lens. A 16mm to 35mm lens captures the full sweep of the Grand Canal or the Bacino di San Marco. A 50mm lens isolates architectural details beautifully during the blue hour.
- ND filters. A 3-stop ND filter reduces incoming light by three stops, enabling longer exposure times for silky water effects even when the sky is still bright. Always compose and focus before attaching the filter.
- Spare batteries. Cold evenings and long exposures drain batteries faster than daytime shooting. Carry at least one fully charged spare.
For camera settings, the table below gives you a practical starting framework across the three main dusk scenarios you will encounter in Venice.
| Scenario | ISO | Aperture | Shutter Speed |
|---|---|---|---|
| Golden hour, moving water blur | 100–400 | f/8–f/11 | 5–20 seconds |
| Blue hour, architecture sharp | 800–3200 | f/5.6–f/8 | 1–8 seconds |
| Canal street scene, mixed light | 800–6400 | f/2.8–f/5.6 | 1/80–1/200 s |
For night and deep blue hour conditions, the baseline night setting of ISO 6400, f/2.8, and a 20-second exposure gives you a reliable starting point. Adjust from there based on how bright the artificial lights are in your specific frame. In mixed artificial light near canals, Auto ISO between 800 and 6400 with a minimum shutter speed of 1/125 seconds keeps moving subjects reasonably sharp while adapting to rapidly changing light levels.
Pro Tip: For manual focusing in low light, switch to Live View and zoom in to 100% on the brightest distant point in your frame, such as a lit window or a lamp reflection on the water. Adjust focus until that point is razor-sharp, then lock it. This Live View focusing method eliminates the misfocusing errors that ruin long exposures.
How to compose and shoot Venice dusk scenes step by step
A structured shooting workflow transforms the chaotic beauty of Venice at dusk into a series of deliberate, confident decisions. Follow these steps and you will capture the full arc of the evening light rather than scrambling to react to it. For deeper compositional context, the Italyphototour guide on Venice canal photography is worth reading before your trip.
- Scout and lock your position 40 minutes before sunset. Walk your chosen location, identify your composition, and set up your tripod. Do not wait until the light is good to start looking for a spot.
- Compose with three layers. Place a foreground element (a gondola, a bridge railing, a mooring post) in the lower third. Fill the middle ground with canal reflections. Let the sky and architecture anchor the upper portion. This layering gives the image depth and scale.
- Shoot the golden hour with a polarizing filter. The warm raking light before sunset saturates the ochre and terracotta facades beautifully. A circular polarizer reduces glare on the water and deepens the sky without affecting the warm tones.
- Transition your settings as the light drops. Every five minutes during the blue hour, check your histogram. Open your aperture or raise your ISO incrementally rather than making large jumps that are hard to reverse.
- Bracket your exposures. Shoot three frames at your metered exposure, one stop under, and one stop over. Venice’s dusk scenes carry extreme contrast between glowing windows and dark canal water. Bracketing in RAW gives you the material to blend highlights and shadows in post-processing.
- Wait for the best dusk moment. The most atmospheric images appear when the sky still holds color and the building lights have fully warmed up. This moment lasts only a few minutes. Stay patient and keep shooting.
The table below compares two common compositional approaches for Venice dusk scenes.
| Approach | Best for | Trade-off |
|---|---|---|
| Wide angle with foreground | Grand Canal, Bacino di San Marco | Requires a strong foreground element or the frame feels empty |
| Telephoto compression | Rialto Bridge, San Giorgio Maggiore | Compresses depth beautifully but needs a stable tripod and precise focus |
Patience is the skill that separates good Venice dusk images from great ones. Venice’s iconic viewpoints can become timing traps when photographers rush to pack up just as the light peaks. Stay five minutes longer than you think you need to.
Where are the best locations for dusk photos in Venice?
Venice rewards photographers who know where to stand. The lighting techniques for dusk work differently at each location, and understanding what each spot offers helps you match your compositional goals to the right place.
Punta della Dogana sits at the tip of the Dorsoduro district where the Grand Canal meets the Giudecca Canal. From here, the domes of Santa Maria della Salute glow amber to your left and the bell tower of San Giorgio Maggiore rises across the water to your right. The wide, unobstructed waterfront gives you room to set up a tripod without blocking foot traffic, and the reflections on the open lagoon during blue hour are among the most dramatic in the city.
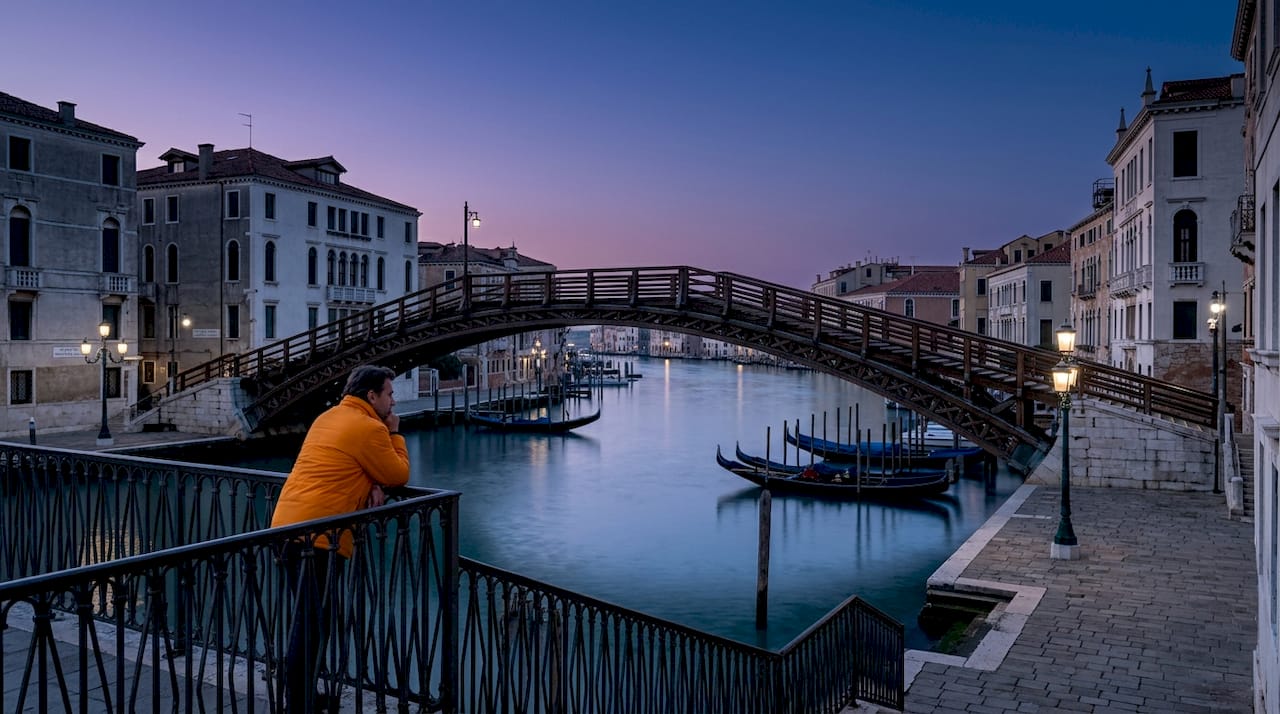
Accademia Bridge offers the most classically composed Grand Canal view in Venice. The wooden bridge frames the scene with gentle curves, and the canal stretches toward the Salute dome in a perspective that has defined Venice photography for generations. Arrive early because this spot fills with photographers and tourists alike. A position on the eastern side of the bridge gives you the best angle for the fading western sky.
Zattere promenade runs along the southern edge of Dorsoduro and faces the Giudecca Canal. The wide waterfront and unobstructed western horizon make it one of the finest sunset photography locations in the city. The light here during golden hour is direct and warm, and the reflections on the broad canal are long and luminous.
Riva degli Schiavoni stretches east from Piazza San Marco along the lagoon edge. The view from here takes in the silhouette of San Giorgio Maggiore against the evening sky, with gondolas and vaporetti adding movement and scale. The promenade is busy, but the sheer width of the lagoon means you can always find a clear sightline.
For those willing to explore beyond the famous spots, the smaller rio canals of Cannaregio and Castello offer intimate dusk scenes with almost no competition for position. The street photography guide for Venice from Italyphototour covers several of these quieter locations in detail.
Key takeaways
Mastering dusk photography in Venice requires arriving early, setting your camera for the blue hour window, and composing with layered foreground, reflection, and sky to capture the city’s full atmospheric depth.
| Point | Details |
|---|---|
| Arrive 30 to 45 minutes early | Secure your tripod position and shoot the golden hour before the blue hour sprint begins. |
| Use the blue hour window | The 20 to 25 minute window after sunset, when artificial lights and sky color balance, produces the most atmospheric images. |
| Set ISO 800 to 6400 | Adjust aperture and shutter speed based on whether you want sharp architecture or silky water effects. |
| Focus with Live View | Zoom in on the brightest point in your frame to lock manual focus before every long exposure. |
| Choose locations by light angle | Punta della Dogana, Accademia Bridge, and Zattere each offer distinct dusk light directions and reflection qualities. |
What I have learned from years of shooting Venice at dusk
The most common mistake I see amateur photographers make in Venice is treating the blue hour like a deadline rather than a conversation. They arrive at the Accademia Bridge, shoot for ten minutes, and leave just as the light reaches its most extraordinary balance. The sky is still holding a deep indigo, the lanterns along the canal are fully warm, and the reflections are perfectly still. That is the moment. And it lasts only a few minutes.
My personal favorite window is the 15 minutes that begin roughly 10 minutes after sunset. The golden tones are gone, the sky has cooled to cobalt, and the artificial lights have had time to warm up fully. The warm and cool contrast at this moment creates a depth that no filter or post-processing can replicate. You either catch it or you miss it.
I also want to push back gently on the idea that technical perfection is the goal. Venice at dusk is one of the most sensory experiences a photographer can have. The smell of the lagoon, the sound of a gondolier calling across the water, the way a passing vaporetto sends ripples through your reflection. Let those things inform your composition. The photographers who make the most memorable images of Venice are not the ones with the most expensive gear. They are the ones who stayed present, waited patiently, and let the city reveal itself.
If you are working on your essential Venice techniques more broadly, I would encourage you to treat dusk as a daily practice during your visit rather than a single event. Each evening in Venice is different. The light changes with the weather, the season, and the tide. Give yourself multiple evenings, and you will find that your images improve dramatically from the first night to the last.
— Mino
Discover Venice dusk photography with Italyphototour
Venice at dusk is one of those experiences that rewards having someone beside you who knows exactly where to stand and when to press the shutter.
Italyphototour offers immersive, expert-led photography tours in Italy designed specifically for amateur and enthusiast photographers who want to move beyond snapshots and into genuine artistry. Led by professional photographer Mino Di Vita, the Venice sessions are built around the golden and blue hour windows, with hands-on guidance for camera settings, composition, and location timing. You get local knowledge, creative coaching, and access to spots that most visitors never find. Explore the full range of immersive photo experiences and find the tour that fits your vision.
FAQ
What time should I arrive for dusk photography in Venice?
Arrive 30 to 45 minutes before sunset to secure your tripod position and capture the golden hour light before the blue hour begins. The blue hour window in Venice lasts approximately 20 to 25 minutes after sunset.
What camera settings work best for Venice blue hour?
Start with ISO 1600, aperture f/5.6, and a shutter speed of 2 to 8 seconds for architecture shots during blue hour. For deeper low-light conditions, move to ISO 6400, f/2.8, and a 20-second exposure as a baseline.
Do I need an ND filter for dusk photography in Venice?
An ND filter is not required for blue hour shooting, but a 3-stop ND filter lets you extend exposures during the brighter golden hour to create silky water effects on the canals. Always compose and focus before attaching the filter.
Which Venice location is best for dusk photos?
Punta della Dogana offers the widest and most dramatic dusk views, with Santa Maria della Salute and San Giorgio Maggiore both visible across open water. Accademia Bridge is the best choice for a classic Grand Canal composition framed by the bridge’s wooden arch.
How do I focus accurately in Venice low-light conditions?
Switch to Live View, zoom in to 100% on the brightest point in your frame such as a lit window or a lamp reflection, and adjust focus manually until that point is sharp. Lock focus before every exposure to avoid drift during long shutter speeds.